Maximize Long Gun Storage in Metal Safe - Rifle Rods Solutions
Posted by Katie Stephey on Dec 03, 2013
A common question we receive at GSS is, "How do I prepare my metal safe/shelves for Rifle Rods?"
To use Rifle Rods, GSS supplies an industrial strength loop fabric shelf liner in Starter Kits. This preps the shelf for use of Rifle Rods. The directions state to use a staple gun or upholstery tacks to attach the loop fabric to a wooden shelf. Many safes are made with particle board shelves, but there are also safes with metal or plastic shelves. Owners of gun safes with metal or plastic shelves are the same as any gun safe owner and they need more room in their safe too! How can these metal safes be adapted to use Rifle Rods?
We found a metal safe to use as an example and took pictures of the BEST way to adapt your safe. The same process can be applied to plastic shelves offered in newer Browning safe models. Please see the images below and read the captions to use this same method on your metal or plastic shelf. This is a relatively painless process, considering the extra space that will be gained for more guns. We know you will be happy in the long run. Click here for a list of tools needed.
*If you are wondering why we don't sell a self-adhesive loop fabric click here.

This is a manufacturer rated 18 gun Sentinel safe (9 rifles on the right side when shelving on the left). GSS was able to fit 8 guns on one side, which is pretty good compared to many other safes. This safe has an entirely metal interior. The shelf is thin with a bend on the front for appearance sake and a bend on the back so items on top will not fall down the gap provided for longer guns. The rifle racks are attached with screws and easily removable for use of Rifle Rods. Below, GSS will make this safe Rifle Rod compatible.

To make this metal shelf Rifle Rod compatible, GSS recommends adding 3/4" thick plywood to the bottom of the shelf. Cut the wood to the size of your specific area and add the loop fabric included in Rifle Rod Starter Kits with a staple gun or upholstery tacks. Mark on shelf where screws need to be placed and drill holes, then screw the board to the shelf. We filled the gap between the shelf and the back wall, but gaps can be left to run longer guns up to the ceiling. For this small piece of fabric
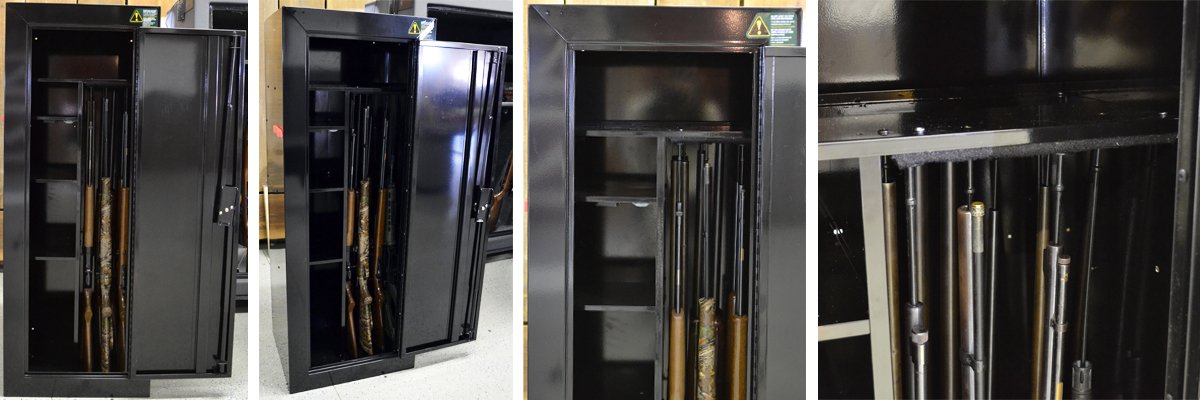
Now the Sentinel safe is adapted to and using Rifle Rods. The fabric covered plywood is hardly noticeable and the Rifle Rods are equally as discrete, creating a visually appealing display of guns. With Rifle Rods, we were able to add 3 more guns to this safe's storage capacity, bringing one side from 8 guns to an 11 gun capacity; or 22 gun safe, rather than 18 gun safe. We included 6 guns with scopes and 5 guns with iron sites in this picture.
Please let us know if you have any further questions in the comment area below or email us so we can add to this post.
The items you will need to adapt the safe are as follows...
- 3/4" plywood cut to the size of your opening for long guns
- Scissors (to cut the loop fabric to size)
- Staple gun/staples OR tack hammer with upholstery tacks (to attach loop fabric to wooden board)
- Power drill
- Drill bit
- Screws
Why doesn't GSS offer a self-adhesive loop fabric?
This is a GREAT question because it would seem like the easiest solution to the problem. BUT - over the past 5 years we have had Rifle Rods on the market, we have learned the hard way that over time an adhesive alone may fail. Until 3 years ago, the Velcro coin on the top of Rifle Rods was attached with only the adhesive backing that came on the coin. Some of our earliest customers started calling and reporting that the adhesive was beginning to fail and their guns were falling over in their safes. Obviously, we were very concerned about this problem and replaced our customers Rifle Rods for free when they called in their reports. It may have been a bad batch of Velcro coins with a faulty adhesive, but we couldn't risk having this problem again.
Only a fraction of our customer base experienced this problem, but it was enough for us to change the building process of the Rifle Rods to have the Velcro coins adhered first, then ultrasonically welded to the plastic of the Rifle Rod. Ever since then, we have had no further issues with the Rifle Rods. It was a lesson learned that only time could tell.
GSS cannot say that a strong adhesive will fail over time, but we do not recommend for our customers to use it. If someone chooses to use a spray adhesive or other strong adhesive on their own accord, please keep a close eye on it especially in the humid, summer months. Thanks for the time you've taken to read this post and install your Rifle Rods with care.
All the best!